Well.... I was going to write up a great post about what I gave Becky, what she gave me, etc. However, Becky did a great job over on her blog, so I'm going to send you over there to check it out!
So head over to Becky Ann Designs and tell her I said hi :)
What Becky gave me!
What I gave Becky
And Lara, if you are reading this - I want to hear how your stocking exchange with your friend went!
Showing posts with label Christmas. Show all posts
Showing posts with label Christmas. Show all posts
Tuesday, December 29, 2009

Monday, November 16, 2009
Mrs. Claus's Workshop
I have so many posts ready to go and cannot post them! So frustrating! But you see... all of my projects lately have been Christmas gifts. And I can't really post them until after the big day, for fear of the recipients seeing them on here. I promise a real post soon though!
Back to my workshop to create more crafty goodness and drink a whole lot more cappuccino.
Talk to you soon!

Back to my workshop to create more crafty goodness and drink a whole lot more cappuccino.
Talk to you soon!

Tuesday, November 10, 2009
Welcome back old friend
I am a complete and total Coca-Cola addict. Not diet, not caffeine free, just straight up, Coca-Cola classic in the red can. However, when the holiday season hits, my best friend coca-cola has to share a shelf in the fridge with this little beauty:

So yummy. So different from the beloved Coca-Cola. And only available during the holiday season. Damn you Sierra Mist corporate big shots! Get me hooked and then take it away. So in the spirit of a true junkie, come December, I will be hoarding a few cases of this yummy goodness for a rainy day craft session.

Sierra Mist Cranberry Splash
So yummy. So different from the beloved Coca-Cola. And only available during the holiday season. Damn you Sierra Mist corporate big shots! Get me hooked and then take it away. So in the spirit of a true junkie, come December, I will be hoarding a few cases of this yummy goodness for a rainy day craft session.
Tuesday, November 3, 2009
Pinecone Wreath
I am a little sad to banish my tulle Halloween Wreath to the attic, however Halloween is done and it's time for a new look. Bring on the Pinecone Wreath! I've been toying with this idea for a couple of years now after seeing them sell at places like Crate & Barrel for upwards of a hundred bucks. Yeah right! I mean, they're just freaking pine cones. They've popped up on quite a few blogs as well this year. Here's how to make your own:


Step 1: Send your kids out into the woods to get some pinecones. We did a "nature hike" at my parents' cabin to aquire the pinecones. You will need quite a bit. I used about half of a reusable shopping bag full of pinecones.

Step 2: Gather your supplies: wreath form (grapevine, styrofoam, whatever you've got laying around), glue gun, tons and tons of glue sticks, your bag of treasures from the woods - or the craft store if you don't have pine trees in your area! Bonus supplies: Cup of coffee and an Ipod

Step 3: Start gluing the pinecones down. It helps to start in one spot and work your way around. You don't want to go all random and then have to fit them in like a puzzle piece.

Step 4: Keep gluing. You're going to have a few moments of "this is NEVER going to end!" Just hang in there. It's worth it! Go refill your coffee at this point. You're going to need it.

Step 5: Once you've got the whole wreath covered, you get to decide how to decorate it. I am a no-fuss, anti-country decor kind of person, so I opted for a simple ribbon to hang mine. However, if the blinged out look floats your boat, then go ahead and add on your goodies. Some of these would work great: ribbon, fabric, leaves, acorns, mini pumpkins or gourds, that harvest corn stuff, etc.

Step 6: Stand back and admire your hard work and try not to think about your sore trigger hand from pumping the hot glue.

Bonus: If you keep it fairly simple for Fall, you can then change the ribbon and add a few Christmas things, and use this baby all way through the new year!
Sneak Peak
A little sneak peak at one of the many projects in progress.....

Look how tiny those little blocks are!

Happy Crafting!
Saturday, October 31, 2009
$6.34 = 7 gifts and an hour of gossip with my mom
I love giving Christmas gifts. It is the best part of the holiday season, aside from the food! However, Mr. Mudpie's family is HUGE. Growing up, all holidays were just me, my sister, mom and dad. That's it. Now, the holidays consist of my family, his mom's family, his dad's family, his dad's extended family and our friends. Sooo, the gift budget is stretched incredibly thin each year. And getting even more scarily thin with the addition of our niece and nephew (and one more on the way!) in the past year.
My solution to this craziness? Homemade gifts! I have 4 teenage girls to buy for this year. Teenage girls are horribly difficult to buy gifts for. I love scarves, and hopefully they will too. So what I did was hit up Hancock Fabrics for their big fleece sale. $3.99/yd! I grabbed 1/3 yard each of 4 different prints that I am hoping the 4 girls will like...... Or at least not completely hate.

How to transform 1/3 yard of fleece into a fabulously inexpensive gift:
I cut each 1/3 yard of fleece in half, the long way. This left me with (2) pieces approximately 6" x 45". I then stitched the 2 pieces together (right sides out) down the middle, and again about 1/2" or so on either side of the first line.

During sewing, the fabrics shifted and moved all over the place, resulting in them not matching up exactly on the sides. No problem! Just trim those bad boys until they are about even on the long sides. They don't have to be perfect; you just don't want one layer to be a lot wider than the other layer.
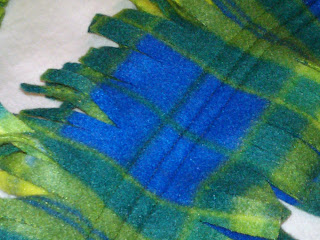 Now comes the fun part! (I handed this off to my mom and we worked assembly line style) Cut little slits along both sides of the scarf about 1/2" apart. Just make sure not to cut through your stiched lines. In case you are like me and are wondering how many cuts that is.....
45" long scarf x cut every 1/2" x 2 sides = around 180 cuts per scarf (Thanks Mom!)
 Once you finish that, you have one cute little inexpensive gift! The tater tot of course wanted in on the action, so she and little man each got a new scarf as well. And sssshhhh, don't tell her.... her American Girl doll, Elizabeth, is getting a matching one for Christmas! I made it from one of the little scraps left from trimming the sides. It took all of 30 seconds to cut a rectangle and add some fringe!
Project cost: $6.34 & some cheesecake to bribe my mom to help me
Yield:
4 adult scarves
2 child scarves
1 doll scarf
Wednesday, October 28, 2009
Christmas Fun for the Moms!
I'm sure most moms know the not-so-fun and rarely spoken aloud part of Christmas morning: you know everything that is under the tree and rarely are there any suprises. Now, I realize just how blessed I am to have healthy children, be able to pay the bills, etc. But sometimes, you just want to feel like a kid on Christmas morning!
Well, this year I will! Becky and I decided this year to do a Stocking Exchange. I am super excited about this! Being that we are what I like to refer to as "frugalistas" (aka. Cheap), we have set some pretty ridiculous rules.
1. The stocking must be homemade and from items already in our sewing/crafting stashes.
2. No more than $5 can be spent
3. At least one item must be purchased from Goodwill (a frugalista favorite)
4. Must include at least 1 candy/food item (because we love to eat!)
Some people might look at that $5 limit and say, "forget it, it's not going to work". But if you know either Becky or I, you know that we will most likely both have trouble fitting all of our loot into the stocking! I'm envisioning us exchanging these monstrous sized stockings filled with all kinds of crazy goodness that only we would love.
Since Becky reads this blog (and I think she might be the only one who does!), I obviously can't post my plans on here until after Christmas. But in case anyone is wondering what we could possibly come up with on such fierce restrictions, be sure to check back after Christmas!
I'm off to START Halloween costumes for the kids. Since we need them for tomorrow night, I should probably at least start them tonight! That's me in true procrastination form.
Well, this year I will! Becky and I decided this year to do a Stocking Exchange. I am super excited about this! Being that we are what I like to refer to as "frugalistas" (aka. Cheap), we have set some pretty ridiculous rules.
1. The stocking must be homemade and from items already in our sewing/crafting stashes.
2. No more than $5 can be spent
3. At least one item must be purchased from Goodwill (a frugalista favorite)
4. Must include at least 1 candy/food item (because we love to eat!)
Some people might look at that $5 limit and say, "forget it, it's not going to work". But if you know either Becky or I, you know that we will most likely both have trouble fitting all of our loot into the stocking! I'm envisioning us exchanging these monstrous sized stockings filled with all kinds of crazy goodness that only we would love.
Since Becky reads this blog (and I think she might be the only one who does!), I obviously can't post my plans on here until after Christmas. But in case anyone is wondering what we could possibly come up with on such fierce restrictions, be sure to check back after Christmas!
I'm off to START Halloween costumes for the kids. Since we need them for tomorrow night, I should probably at least start them tonight! That's me in true procrastination form.
Subscribe to:
Posts (Atom)